If there's one thing I've heard several too many times in my years of baking and cake decorating, its the sentence, "I wish I had the talent to do that." And there's nothing that will get me jumping onto my soapbox quicker, eager to explain that there is literally no intrinsic talent involved. Like every creative endeavour or otherwise, it's nothing but years of accumulated skills, knowledge and practice practise practise. So, you want to start baking, maybe it feels like everything you touch is a mess and you don't know where to start. Well, before you can even start trying to do anything fancy you need to prepare your canvas. Or to put it crudely: you can't polish a turd. If your cake is pitiful, no amount of icing is going to cover that up - particularly when people start to sink their teeth into it! So in this article I'm going to take you through all the basics of getting those cakes from oven to plate to iced.
Preparation
Before you get over-excited and delve head-first into a recipe, take the time to prepare. The difficulty of baking, as opposed to cooking, is that once that baby is in the oven there's little to nothing you can do to fix mistakes. Baking is just an edible chemical reaction: melting fats and sugars in the batter give off carbon dioxide, which activates the gluten in the flour, which in turn bursts the starch grains in the flour, which in turn absorb the melted liquids... What this means is that if you do something to disrupt the process before it's even in the oven, it's going to change the outcome. Sound stressful? Don't worry! You don't need a degree in organic chemistry, you just need to take the time to prepare properly.
- Start by reading the entire recipe all the way through, making sure you understand the steps and what will be required of you. Any decent, and especially complicated, recipe will have a plethora of tips and tricks throughout that you don't want to be discovering half way through.
- Have your ingredients at room temperature. Most refrigerated ingredients will cause havoc in your batter if you add them cold. Butter is far easier to whip when at room temperature (especially important in recipes using the 'creaming' method). You might put a lot of effort into beating the butter and sugar together, only to add fridge-temperature eggs and/or milk and cause the fats and solids in your butter to split and curdle. It worth taking the time to do it right.
- Preheat your oven. Baking your cake at too low an initial temperate will result not only in different baking time to the recipe, but may result in poor texture and uneven cooking.
- Line your cake tins before you start mixing your batter. Not only does properly lining your tins result in an easy to remove cake, but once the batter is mixed it usually needs to be baked immediately. Recipes with bicarb soda or cream of tartar (including that in self-raising flour) begin reacting as soon as they are in contact with the liquid, specifically those with acidic (citrus, vinegar, etc) elements.
- Get to know your oven. Every oven is a little bit different, especially if it's not fan forced. If you find baking times in recipes are always 5-10 minutes out, it's probably just your oven. While following recipes as closely as possible is the best idea, getting to know how yours works, where the hot spots are, where things rise the best and when your baked goods are ready and adjusting accordingly is an important skill. This is especially the case in short, time-dependant baked goods like macarons and tuiles. That said, if your oven is widely different from every recipe you might wanna get an over-safe thermometer and check it out!
Picking your recipe
So you've gotten yourself ready for a good baking sesh, but how do you know if the recipe you've found is any good? As someone who grew up without the internet being A Thing, there's definitely a lot of positives in having such easy access of information. But one glaring negative is that online, anyone and everyone can post recipes and they don't always know what they're talking about. Websites with reviews can be helpful, but if you've frequented any of them you'll know how often you'll find 5-starred recipes with a comment section full of people saying that had to change X-thing to make it work. The more experience you get, the more you'll see patterns in recipes you'll recognise and remember. But for a more reliable approach there are ratios. Learning baking ratios is definitely a more old-school approach to baking, and anyone who has a lot of old cook books will probably have seen them before. It's also universal in the way many recipes are not. Most reliable cake recipes are simply a good baking ratio with bits added to change the flavour. Here's a list of some really basic baking ratios to remember:
- Butter Cake 2:1:1 -- 2 parts flour : 1 part fat : 1 part sugar (cakes typically made using the creaming method)
- Sponge Cake/Pound Cake 1:1:1:1 -- 1 part flour : 1 part egg : 1 part fat : 1 part sugar (cakes typically made using the beating method)
- Egg sponge/Italian sponge cake 2:1:1 -- 2 parts egg : 1 part sugar : 1 part flour (cakes made by beating whole eggs for 10 minutes -- do not have any leavening ingredients added)
- Angel food cake 3:3:1:0 -- 3 parts egg : 3 parts sugar : 1 part flour : 0 parts fat (cakes made with meringue/eggs whites only)
- Biscuits: 3:2:1 -- 3 parts flour : 2 parts liquid : 1 part fat (cookies that spread when baked)
- Sugar cookies 3:2:1 -- 3 parts flour : 2 parts fat : 1 part sugar (rollable dough that holds shape when cut and baked)
- Soft buttercream 1:1 -- 1 part sugar : 1 part fat
- Crusting buttercream 2:1 -- 2 parts sugar : 1 part fat
- Whipable chocolate ganache 2:1 -- 2 parts chocolate : 1 part cream
Preparing for decorating
So you've taken your cake out of the oven... what now? All too often I've seen cake disasters that could have been solved with a little patience. Here's a few steps simple that will take your cake game to the next level.
- Let it cool! When you first remove the cake from the oven its still in the process of cooking. You shouldn't even remove it from the cake tin until it's had at least 10 minutes to cool to set the structure. When you remove it from the tin, allow it to cook on a cake rack until it's cooled to room temperature. If you try to decorate it while its too warm, your fillings and icings will melt and slough off.
- Layering: If you want to put icing or filling between cake layers you want to take the time to get the most even layers possible. Serrated knives are best for cutting through cakes. But if you're terrible with a knife and cant seem to cut straight to save your life, never fear! You can layer most cakes with a piece of string! I have a super old tutorial here for layering cakes with string that will give you perfect layers.
- Turn it upside down: If you take a lot of the preparation steps mentioned earlier you shouldn't end up with a volcano of a cake. But don't drive yourself insane trying to bake a perfectly level cake. Even the best recipes usually have a slight dome to them. So how does everyone else seem to have these perfectly flat cakes all the time? We layer off the dome and flip the cake over.
 The bottom of the cake always has the sharpest edge and always makes for the prettiest top layer.
 - Crumb coat: If you're icing your cake with a spreadable icing (rather than pouring it over) you should get acquainted with crumb (or dirty) coating your cakes. This involves spreading a thin layer of your icing over the cake and letting it set before covering it with the rest of the icing. This prevents tearing your cake while trying to spread the icing evenly over it. But most importantly it 'locks' all the crumbs that flake off in the bottom layer of icing so they wont show up in your final layer.
Tools of the trade
One thing I'm pretty vocal about is not wasting money in any art form buying all the fancy tools and gear and thinking it's going to solve your problems. I spent most of my early cake decorating years using nothing but a butter knife and a toothpick. When I did decide take a trip into a cake decorating store, many of the tools I bought promised the world and proved to be nothing more than a gimmick. It's important to know that no tools can be a substitute for practise and skill. But if you're looking to get more into baking and want to know where to start, here's a list of tools I could not live without now.
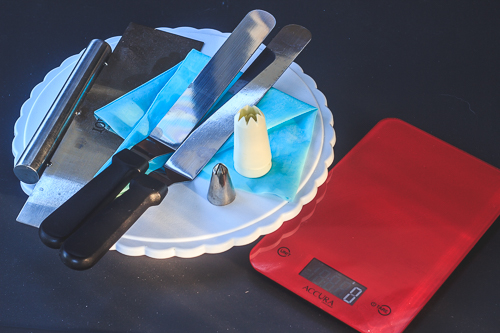
- Digital scales: Having accurate measurements will be more crucial in some recipes than others, but having a good set of scales will make your life so much easier. Good recipes will list ingredients in terms of weight. Cup measurements can be iffy, especially for non-liquid ingredients. Further, there is a difference in size between a metric and imperial cup, and most recipes don't tell you which one they are using!
- Palate knife: Palate knives are wonderful tools for applying icing to cakes. You can make do with a flat bladed butter knife if you must, but for a lovely finish a palate knife will make your job quicker, easier and just better looking. For most whipped icings you need to work the bubbles out when applying the icing and palate knives help you do just that.
- Reusable/silicone piping bags: It's tempting to go for the cheap plastic piping bags, but not only is moving away from single-use plastic better for the environment, it will save you money long-term. Silicone piping bags are a good cheaper option for a washable and reusable piping bag, especially if you need lots of different sizes for different width piping tips. But if you're sticking with the hobby its worth investing in some good quality fabric piping bags. Over time I've come to prefer the plastic-lined fabric piping bags as they are easier to clean.
- Piping tips: Along with your piping bags you'll want some piping tips. Don't get sucked into buying a whole set without having a purpose in mind for it. Simple small rounded tips are great for piping royal icing onto sugar cookies and adding details to a cake. A wider round tip like a 1A is great for piping macarons and other larger decorations. My absolute favourite piping tip is a 1M, which will give you the beautiful piped roses and swirls you see on cupcakes and cakes. Look at what icing piped through that tip looks like before you decide whether or not it's something you will use.
- Turntable: There's a variety of turntables on the market with lots of different functions. If you have the funds for it, a turntable that both tilts and locks is an invaluable asset. But you can also get cheaper turntables that just turn. It makes icing your cakes so much easier, allowing you to use the spinning movement to applying icing and get around to each side of the cake effortlessly.
- Cake scraper: If you're getting a turntable, a cake scraper is a wonderful tool to pair with it. By holding it up to the cake while spinning the turntable you can get super smooth icing. With time and practise you can get buttercream or ganache looking just as smooth as fondant!


